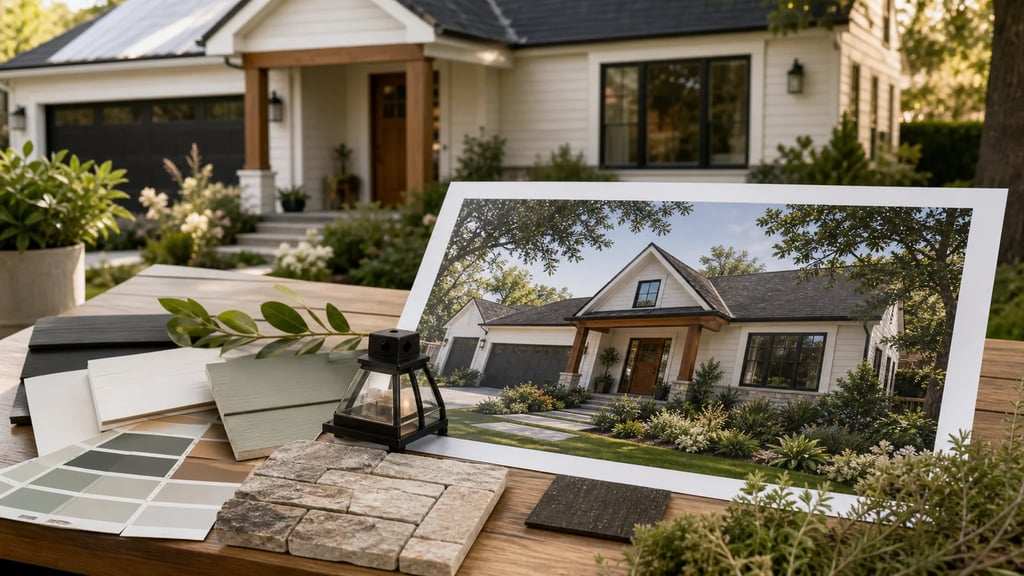
You can redesign a home exterior with AI by uploading one clear photo of your house, choosing a design style, and generating photorealistic versions of the same facade in different colors, materials, and planting. The process takes about 15 to 30 minutes and gives you renders you can compare side by side before spending money on paint or contractors. Below is the exact step-by-step workflow, plus a photo checklist and the settings that produce the most believable results.
Quick Answer
To redesign your home exterior with AI: (1) take a straight-on, evenly lit photo of the whole facade, (2) upload it to a paid exterior design tool like AI Smart Decor and select exterior or garden mode, (3) pick a style and note any materials you want to keep, (4) generate four to six variations at once, (5) compare them next to the original, and (6) refine your favorite one element at a time. The single biggest factor in quality is the input photo, not the prompt.
Why start with the photo instead of the prompt?
The photo controls everything. AI exterior design tools read the geometry of your house from the image you give them, so a crooked, shadowy, or cropped photo forces the tool to guess at edges and proportions. A clean photo gives it accurate lines to redesign around, which is why professionals and good results both start in the same place.
Most disappointing AI exterior renders trace back to a bad input, not a bad tool. If your roofline is cut off or half the facade sits in deep shadow, the generation has to invent those areas, and invented areas are where things look fake. Spend two extra minutes on the photo and you save yourself a dozen wasted generations.
Think of the photo as the foundation. You can change siding color, add a porch, or swap out the front door with a follow-up prompt, but you cannot fix a tilted, blurry base image after the fact.
What makes a good exterior photo for AI?
A good photo is straight-on, captures the whole facade plus a little yard, and is taken in soft, even light. The goal is to give the tool clear, unambiguous edges for the roof, walls, windows, and ground line. Anything that hides those edges, like shadows, cars, or trees in front of the house, makes the redesign less accurate.
Here is the checklist worth running through before you upload anything.
| Photo factor | Target | Why it matters |
|---|---|---|
| Lighting | Overcast sky or soft morning light | Hard shadows hide siding and trim detail the tool needs to redraw |
| Angle | Straight-on, camera held level | Tilted shots distort proportions and confuse the roof and wall edges |
| Framing | Whole facade plus a strip of yard and sky | Cropped rooflines force the tool to invent the missing structure |
| Obstructions | No cars, bins, or people in front | Foreground clutter gets baked into the redesign or removed inaccurately |
| Resolution | 1500 px wide or larger | Low-resolution input produces soft, mushy renders with weak detail |
| Distance | Stand back so the house fills most of the frame | Too far loses detail, too close cuts off corners of the building |
If you can only fix one thing, fix the lighting. An overcast day is the single easiest way to get a clean, redrawable exterior, because flat light shows the real color of brick, stucco, and siding without competing shadows.
How do you redesign a home exterior with AI, step by step?
The full workflow is six steps, and each one builds on the last. Below is the same process expanded with the practical detail that makes the difference between a usable render and a throwaway one.
Step 1: Photograph the full exterior
Stand back far enough to capture the roofline, the full facade, and a strip of the yard and sky. Hold your phone level so the vertical lines of the corners stay vertical. Shoot when the front of the house is in soft light, which for most homes means an overcast day or the hour after sunrise.
Step 2: Upload and choose exterior mode
Open AI Smart Decor, upload your photo, and select the exterior or garden option rather than an interior room type. This tells the tool to treat the walls, roof, and planting beds as outdoor surfaces, so it does not try to add furniture or indoor lighting where it does not belong.
Step 3: Pick a style and protect what you keep
Choose a style direction such as modern farmhouse, Mediterranean, Craftsman, or mid-century. Then, in the prompt field, name anything that has to stay, like "keep the red brick base" or "keep the existing metal roof." Stating what stays fixed is just as important as stating what changes.
Step 4: Generate several variations
Run the generation and ask for multiple outputs from the same photo. Four to six versions give you a genuine spread of cladding colors, door styles, and planting ideas to react to. One render rarely lands; a batch lets you see which direction actually fits your house.
Step 5: Compare against the original
Open the original photo next to each generated version. Judge them against your real constraints, like the color of a roof you are not replacing, your neighbor's homes, and your budget, not just which thumbnail looks nicest on its own.
Step 6: Refine one element at a time
Take your favorite result and change a single thing per pass: darker siding, a wider walkway, a different front door, fuller planting along the path. Changing one element at a time keeps each render controlled and stops the tool from drifting away from the look you already liked.
A tested 20-minute exterior redesign workflow
Here is a concrete timing breakdown from running this process on a typical single-story house, so you know where the minutes actually go. This is the rhythm that produces a contractor-ready render without burning through your monthly design allowance.
| Stage | Time | Designs used | Notes |
|---|---|---|---|
| Take and pick the photo | 5 min | 0 | Shoot two or three angles, keep the straightest one |
| First style batch | 4 min | 4 | Try one bold and one safe style to set the range |
| Compare and shortlist | 3 min | 0 | Cut to one or two directions before generating more |
| Second style batch | 4 min | 4 | Generate variations of the shortlisted direction only |
| Refine the winner | 4 min | 3 | One element changed per generation: siding, then door, then planting |
| Export | minutes vary | 0 | Download the final at full resolution |
Total: roughly 20 minutes and about 11 designs. On the Lite plan at $29 per month for 800 images, that is enough allowance for around 18 complete exterior redesigns in a month, and the Ultra plan at $99 for 5,000 images covers heavy use across many properties. Budgeting your generations this way, by shortlisting before you generate more, is how you avoid spending 40 designs to land on one look.
How is AI exterior design different from interior design?
Exterior design has to respect things you cannot move: the roof pitch, the position of windows, the grade of the yard, and the neighbors. Interior redesigns happen inside a controlled box, while a house exterior sits in real weather, real light, and a real street, so the tool has to keep more of the original photo intact to stay believable.
The materials are different too. Outside you are working with siding, stucco, brick, stone, metal roofing, and planting beds rather than paint, flooring, and furniture. A tool built only for rooms often struggles to render those surfaces convincingly, which is why using an exterior or garden mode matters.
AI Smart Decor handles both interior and exterior or landscape work, so the same account that redesigns your living room can replan the front yard. That overlap is useful when you are planning a whole-home refresh and want a consistent look from the curb to the back patio.
What should you avoid when you redesign a house exterior with AI?
Avoid vague prompts, single renders, and treating the output as a construction document. The most common mistakes are asking for too much in one pass, accepting the first image, and forgetting to lock in the parts of the house you are actually keeping.
Watch for these specific traps:
- Changing five things at once, so you cannot tell which change you liked.
- Skipping the comparison step and picking the prettiest thumbnail instead of the best fit.
- Ignoring fixed materials, which leads to renders showing a roof color you have no plans to pay for.
- Using a shadowy or angled photo, then blaming the tool for soft results.
- Treating the render as exact. It shows color, cladding, and planting ideas, not load-bearing decisions.
Keep the original photo next to every final render. An honest before-and-after is what makes the redesign useful when you sit down with a contractor or a paint store, because it shows exactly which surfaces change and which stay the same.
Related Articles
- AI Landscape Design: The Complete Guide
- AI Home Exterior Design Ideas
- Best AI Landscape Design Software
- Home Renovation AI
Ready to see your house in a new style? Start your exterior redesign with AI Smart Decor.