Want to try it now? Use the free AI room design generator to upload a room photo and follow the tutorial with a real example.
Most people who try AI room design get mediocre results the first time, then give up. The tool is not the problem. The photo is. Or the style selection. Or stopping after one generation. This tutorial covers every step in the actual order it matters, with specific examples so you know exactly what to do.
Step 1: Choose the Right AI Room Design Tool
Not all AI room design tools work the same way. There are two fundamentally different approaches, and picking the wrong one wastes your time.
| Tool Type | What It Does | Best For |
|---|---|---|
| Photo-to-design (generative AI) | Transforms a room photo into a redesigned image | Visualizing style changes, redecorating |
| Floor plan / layout planner | Drag-and-drop 2D/3D layout editor | Furniture arrangement, space planning |
| Hybrid | Both, or AI-assisted layout + render | Full renovation planning |
For most homeowners who want to see what their room could look like, a photo-based tool is the right choice. AI Smart Decor falls into this category: upload a photo, select a style, get a photorealistic redesign in under 30 seconds. Tools like Planner 5D are better if you need a precise floor plan with exact furniture dimensions.
Pick one tool and learn it before trying others. The learning curve is short — about 15 minutes — but jumping between tools before you understand the basics produces inconsistent results.
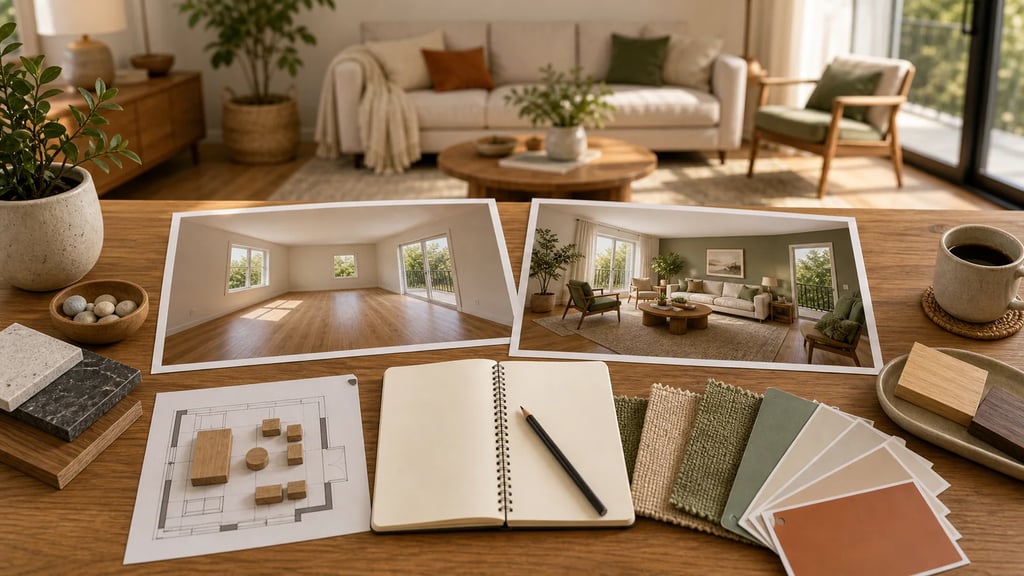
Step 2: Take the Right Photo
This is where most attempts fail. The AI cannot fix a bad photo. Here is what works.
Shoot from a corner. Stand in one corner of the room and point the camera at the opposite corner. This gives the AI maximum spatial context — two walls, the floor, and ceiling in a single frame.
Shoot at shoulder height. Not from the floor, not from ceiling level. Shoulder height (roughly 5 feet) produces the most natural perspective. Phone held level, not tilted up or down.
Light the room properly. Turn on every light in the room. Open blinds or curtains. The AI struggles with deep shadows because it cannot tell if a dark area is a shadow, a dark-colored wall, or missing furniture. More light = more accurate analysis.
Specific examples of photos that work well:
- Living room shot from the back corner, facing the TV wall and sofa, with floor lamp and overhead light both on
- Bedroom shot from the doorway corner, facing the bed and window wall, midday natural light
- Kitchen shot from the entry point, facing the counter and appliances, all cabinet lights on
Photos that consistently produce poor results:
- Straight-on shots of a single wall (no depth information)
- Heavily cluttered rooms where the AI cannot distinguish furniture from objects
- Dark photos with a single window creating harsh backlight
- Extreme wide-angle or fisheye shots (distorts proportions)
File specs: JPEG or PNG, minimum 1MB, ideally 2–5MB. Most modern phone cameras produce files in this range by default.
Step 3: Upload and Set Your Room Type
After uploading, most tools ask you to specify the room type. Do not skip this or leave it on "auto." Telling the AI it is a living room versus a studio apartment changes which furniture categories it draws from and how it handles open-plan layouts.
If your room has a specific use case — home office, nursery, reading room — specify it. Generic selections like "bedroom" work, but the more specific you are, the more relevant the output.
Step 4: Select a Design Style
Most tools offer 15–30 preset styles. The common mistake is picking the most dramatic-sounding option without thinking about what actually suits the room's architecture.
Match the style to your room's bones. A Victorian terrace with original cornicing and high ceilings will look incoherent in a Scandinavian minimalist redesign. Modern industrial works better. A low-ceiling suburban room fights against maximalist or baroque styles.
Style categories to understand:
| Style | Key Characteristics | Best Room Types |
|---|---|---|
| Scandinavian / Nordic | Light woods, white walls, functional furniture | Bedrooms, living rooms |
| Modern Minimalist | Clean lines, neutral palette, no clutter | Studios, home offices |
| Industrial | Exposed brick/metal, dark tones, raw textures | Living rooms, lofts |
| Coastal / Hamptons | Blues, whites, natural textures, light | Bedrooms, bathrooms |
| Mid-Century Modern | Warm woods, tapered legs, retro palette | Living rooms, dining rooms |
| Japandi | Minimalism + warmth, neutral earth tones | Any room |
| Bohemian | Layered textiles, plants, eclectic mix | Bedrooms, living rooms |
If you are undecided, run the same photo through three different styles before committing. It takes 90 seconds total and gives you a real comparison.
Step 5: Generate and Review the First Result
The first result is a starting point, not a final answer. Review it for:
- Overall vibe: Does it feel right for how you want to use the room?
- Furniture scale: Does the sofa look proportional to the room, or oversized?
- Color palette: Are the wall and floor colors something you would realistically choose?
- Problem areas: Is there an awkward corner, a window that got blocked, or furniture that clips through a wall?
If the first result is 70% right, you are in good shape. Iterate from there.
Step 6: Iterate — This Is Where the Work Happens
One generation is not a design process. Here is a practical iteration workflow:
- Run 3 style variants on your original photo to find the right direction
- Pick the closest result and use it as your base
- Adjust specific elements: most tools let you re-prompt for different wall colors, swap furniture styles, or change the flooring
- Run 2–3 more generations within your chosen style until you have a result you would actually implement
- Compare side by side: download your top two or three results and view them in a photo viewer to compare
AI Smart Decor makes this workflow fast because generations take under 30 seconds and the interface lets you compare previous results without re-uploading the photo each time.
Step 7: Export the Design and Build a Shopping List
A good AI design output is actionable. Here is how to use it:
Export a high-resolution image. Use this as your reference when shopping. Pull it up on your phone in a furniture store to compare scale and color.
Identify the key pieces. Look at your output and note: what is the sofa style? What type of rug? What are the accent colors? These are your shopping parameters.
Build a style brief. Write down five words that describe the design — "warm, minimal, oak tones, textured linen, brass accents." This brief guides every purchase decision and stops you from buying something that looked good in isolation but breaks the room's coherence.
Use the design for paint samples. Screenshot a close-up of the wall area and take it to a paint store. Color-match services can get you within one or two shades of the AI's suggested color.
Common Mistakes That Kill Results
Stopping after one generation. The first result is statistically unlikely to be the best one. Run more.
Using a photo taken on a different day with different lighting. Consistency matters if you want to compare results.
Selecting a style because it sounds interesting, not because it suits the room. A "luxury maximalist" redesign of a 10x10 bedroom will produce a claustrophobic mess.
Trying to design an empty room. Photo-based AI tools work better with some furniture present because it gives them scale references. Completely empty rooms often produce results that look like staged showrooms rather than liveable spaces.
What AI Room Design Cannot Do
It cannot redesign structural elements — load-bearing walls, window placement, door locations. It cannot produce exact furniture dimensions or precise measurements. And it is not a replacement for an interior designer if you are doing a major renovation. Use it for vision and direction, not as technical specification.
Turn the AI Result Into a Real Plan
After you pick the best image, write down the parts you can act on:
| AI Detail | Real-World Decision |
|---|---|
| Sofa shape | Sectional, loveseat, or sofa-and-chair layout |
| Rug size | Approximate room zone and furniture coverage |
| Wall color | Paint family to sample in real light |
| Lighting | Floor lamps, sconces, pendants, or table lamps |
| Storage | Console, cabinet, dresser, shelves, or baskets |
Then measure before buying. The AI image should guide taste and priorities, while real measurements decide product size.
Example Prompt
Redesign this living room in a warm modern style. Keep the windows, doors, flooring, and room shape the same. Use a comfortable neutral sofa, large rug, warm wood, closed storage, layered lamps, simple art, and a layout with clear walking paths. Make the room practical for daily family use.
For more on choosing the right tools at each stage of your project, see Best AI Home Design Software and AI Home Design Software for Beginners.