AI room design applications are useful in proportion to how specifically you apply them. Generic experimentation gives you generic results. But when you bring a clear goal — staging a home, optimizing an Airbnb, planning holiday decor — an AI room design application becomes a precision tool that saves time and eliminates guesswork.
This guide covers five real-world scenarios where a room design application delivers measurable value, with step-by-step instructions for each.
Scenario 1: Selling a House
Home staging increases sale price by an average of 1–5% and reduces days on market. Physical staging costs $1,500–$5,000 per room. AI room design application costs: near zero.
The goal: Create listing photos that make rooms look their best — without renting furniture or hiring a stager.
Step-by-step:
- Photograph every room you plan to list. Natural light, market orientation, shot from corners to capture full width. Declutter before shooting — the AI output is only as clean as the input.
- Upload to an AI room design application (AI Smart Decor works well here). Select a neutral, broadly appealing style: Scandinavian, Modern Minimal, or Contemporary. Avoid bold or niche styles that polarize buyers.
- Generate 3–4 variations per room. You want options to compare — slight differences in color palette or furniture layout can dramatically change how spacious a room feels.
- Identify the design direction that makes the room feel largest and brightest. Lighter furniture, minimal visual clutter, and cooler tones tend to photograph well online.
- Extract the key elements from the winning render: wall color, furniture silhouettes, rug pattern. Use this as your brief if you need to do any physical updates before listing.
- Use the renders directly in your listing. Add a disclosure that photos are AI-generated design concepts. Many buyers appreciate the vision.
What you save: $3,000–$8,000 in staging costs. What you gain: professional listing visuals in under an hour.
Scenario 2: Refreshing a Rental
Renters face hard constraints: no painting, no permanent fixtures, landlord approval for major changes. An AI room design application is particularly useful here because it lets you experiment within those constraints before spending a dollar.
The goal: Transform the look of a rental using only furniture, textiles, and decor — no structural changes.
Step-by-step:
- Document the current state. Photograph the room as-is, including all fixed elements: floors, trim color, window frames. These won't change, so the AI needs to account for them.
- Upload to the AI room design application and generate designs that complement (not fight) the existing finishes. If you have oak floors, select warm-toned styles. For grey carpet, cooler neutrals work better.
- Note what the AI changes vs. what it preserves. The AI will replace furniture, rugs, curtains, and lighting while working around the fixed elements. This tells you exactly where your budget should go.
- Create a shopping list from the render. Identify furniture pieces that match the shapes and tones in the AI output. Use the render as a reference image when searching Amazon, IKEA, or Wayfair.
- Prioritize by visual impact. A new sofa or rug changes a room more than 10 small accessories combined. Buy the big pieces first.
- Re-photograph after each major addition and run the room through the AI again to recalibrate your next purchases.
What you should know: Rental refresh budgets work best when spent on a few high-impact pieces rather than scattered across many. AI renders show you which pieces those are before you buy.
Scenario 3: Redesigning After a Move
You've moved into a new place. Your old furniture may not fit the new rooms — in size, proportion, or style. An AI room design application helps you figure out what stays, what goes, and what needs replacing before you commit.
The goal: Plan a complete room design for a new space using a mix of existing furniture and new purchases.
Step-by-step:
- Photograph the empty rooms immediately: before you move anything in. This is your cleanest canvas. If furniture is already in, photograph anyway.
- Generate AI designs for the empty room to see what the space can become with no constraints. This sets your target.
- Inventory your existing furniture. Note dimensions, materials, and colors.
- Cross-reference against the AI render. If the AI places a large sectional and you own a sectional, check: do the dimensions work? Does the color fit the palette?
- Identify the gaps. What does the AI design include that you don't own? That's your shopping list.
- Run a second generation with rough stand-ins for your existing pieces to see how they interact with the new space. Adjust style selections until you find a direction where your existing furniture fits naturally.
What this prevents: Moving all your furniture in, realizing it looks wrong, then spending weeks rearranging. The AI gives you a plan before the movers arrive.
Scenario 4: Holiday Decor Planning
Holiday decorating is time-sensitive and temporary — you're working with a short window and a room that already has a permanent design. AI room design application helps you plan seasonal decor that improves the room rather than clashing with it.
The goal: Map out holiday decor additions that look intentional and cohesive with your existing space.
Step-by-step:
- Photograph the room as it currently looks: with its existing furniture, colors, and fixtures.
- Upload to the AI room design application and select a style that incorporates seasonal elements. Some tools allow text prompts; use terms like "holiday living room," "winter cozy," or "festive minimal."
- Look at what the AI adds to the base design: wreaths, throws, lighting, color accents. Note the color palette it uses — warm whites and deep greens work differently than red-and-gold combinations.
- Cross-reference with your existing decor inventory. Which of these additions do you already own? What's missing?
- Use the render as a shopping reference. When buying holiday decor, refer back to the AI image to stay on palette. Impulse buys that clash with the AI's color scheme will clash with your room.
- Plan the layout. Note where the AI places each decorative element. This prevents the "dump everything in the corner" problem that makes holiday decor look chaotic.
Time saved: 2–3 hours of rearranging furniture and decor on the day. You arrive with a plan.
Scenario 5: Airbnb Optimization
Airbnb listing photos are the primary conversion driver — better photos mean more bookings and higher nightly rates. An AI room design application lets you redesign your listing space to appeal to the broadest possible guest demographic, then implement selectively based on budget.
The goal: Generate a design direction that maximizes visual appeal in listing photos and differentiates your property from nearby competitors.
Step-by-step:
- Research comparable listings in your area. What do the top-rated properties look like? What styles appear most frequently? Note the gaps — if every competitor has industrial-loft styling, a warm Japandi design will stand out.
- Photograph every bookable room. Guests make booking decisions based on bedroom and bathroom photos as much as living spaces.
- Upload to AI Smart Decor and generate designs targeting the style gap you identified. Select styles that photograph well: clean lines, high contrast between furniture and walls, minimal visual noise.
- Evaluate the output against your current space. What changes would have the highest photo impact for the lowest cost? New bedding and throw pillows cost $80 and show up dramatically in photos. New sofas cost $800 and show up similarly.
- Prioritize the bedroom and main living space. These are the rooms guests examine most carefully. Bathrooms are third.
- Implement in phases. Start with textiles and lighting (low cost, high visual return), then furniture if the booking rate justifies the investment.
- Re-photograph after each phase and update your listing. Track whether booking rates or nightly rate acceptability changes.
The ROI math: A 10% increase in booking rate on a property generating $2,000/month in revenue is $200/month. Redesign costs paid back in 1–3 months.
Choosing the Right AI Room Design Application
Not every room design application is built for practical application. Here's what separates useful tools from novelty generators:
| Feature | Why It Matters |
|---|---|
| Photo-based input (not just 3D) | Real rooms aren't 3D models. Photo-based AI works with what you have. |
| Multiple style options | Different scenarios require different styles. 20+ options beats 5. |
| High-resolution output | Low-res renders are useless for listing photos or client presentations. |
| Fast generation (under 60 sec) | You'll run many variations. Speed determines how many you can explore. |
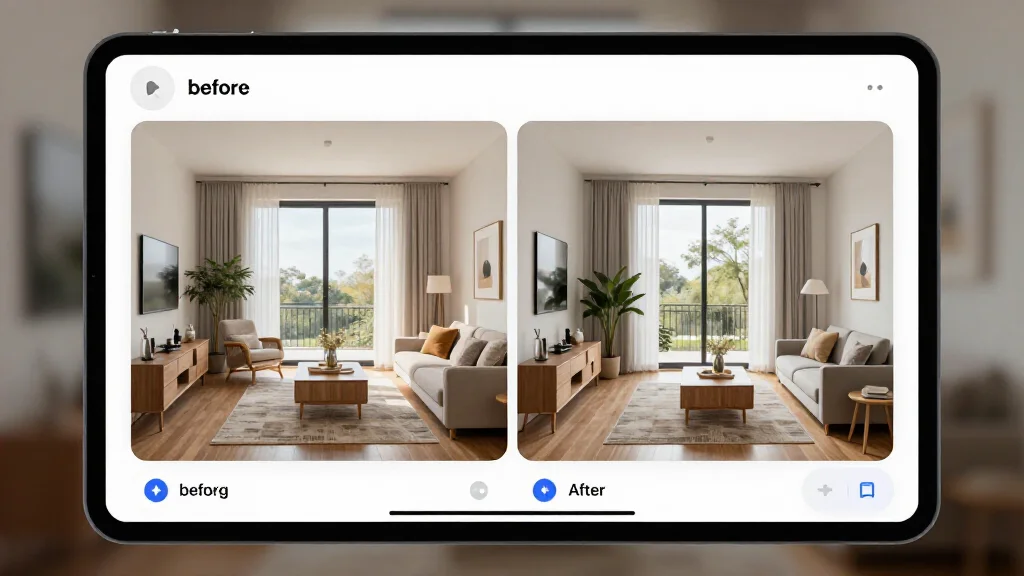
| Before/after comparison | Makes it easy to show clients or family the transformation. |
| Free tier to test quality | Output quality varies significantly between tools. Test before paying. |
AI Smart Decor covers all of these — it's purpose-built for practical room redesign, not just experimentation. The paid plan lets you validate quality before committing.
From AI Output to Real Room: The Bridge Step
The most common mistake is treating the AI render as an end goal. It isn't — it's a reference. Here's how to bridge the AI output and the real room:
- Extract the 3–4 defining elements from the render: dominant wall color, primary furniture piece, rug pattern, lighting type.
- Build a mood board from the render. Screenshot key details and organize by category: furniture, color, textiles.
- Shop to the render, not your memory of it. When browsing furniture, have the render open for comparison. Color and proportion drift quickly from memory.
- Allow for substitutions. The AI generates idealized versions of furniture. Real-world equivalents exist at every price point. A $1,200 sofa in the render has a $400 equivalent at IKEA.
- Reassess at each major purchase. After buying the primary piece, re-run the AI with updated photos to verify subsequent purchases stay cohesive.